Not Your College Ramen
The painful financial plight of most college/university students while they are studying is new news to no one. When I was in grad school, it was a running joke. Not because we weren’t counting our pocket change, but because when times are tough, laughter helps one make it through. While I’m not as in touch with college students as I once was (I no longer teach there), some things never change. Ramen, despite its Japanese origins, is a staple of the college student/grad student/researcher/adjunct instructor diet here in the US. When one can get a meal for $0.35, one simply goes with it. Notice I did not say one doesn’t complain, mock, and quietly lament.
Once I graduated and secured a “big girl” job, I really didn’t give ramen any more thought. It was part of the past, and part of the beauty of being an independent, employed adult was that I didn’t have to eat it anymore. This is primarily because I had been consuming your average college ramen, which is that single noodle brick wrapped in plastic and containing a seasoning packet one dumps in the water after the noodles are cooked, the packet with enough sodium to raise the blood pressure of an elephant.
But in recent years, I have rediscovered ramen, real ramen, by frequenting various Asian restaurants, and like most foods, a real version is worlds better (and better for you) than the instant. Ramen is simply a style of noodle, and like most noodles, the dish is only as good as how the noodles are prepared and what is put with them. Now, most ramen is served as a soup. I love the soup. There is an awesome ramen spot here in Charlotte that specializes in those soups – Futo Buta. The food is outstanding. If you’re in the area, the only thing that might make you regret a visit is the wait. But also, look carefully at the menu next time you are in your favorite Asian restaurant, especially if it is Asian fusion or features dishes from a variety of Asian cultures. There is likely a stir-fried ramen dish on the menu.
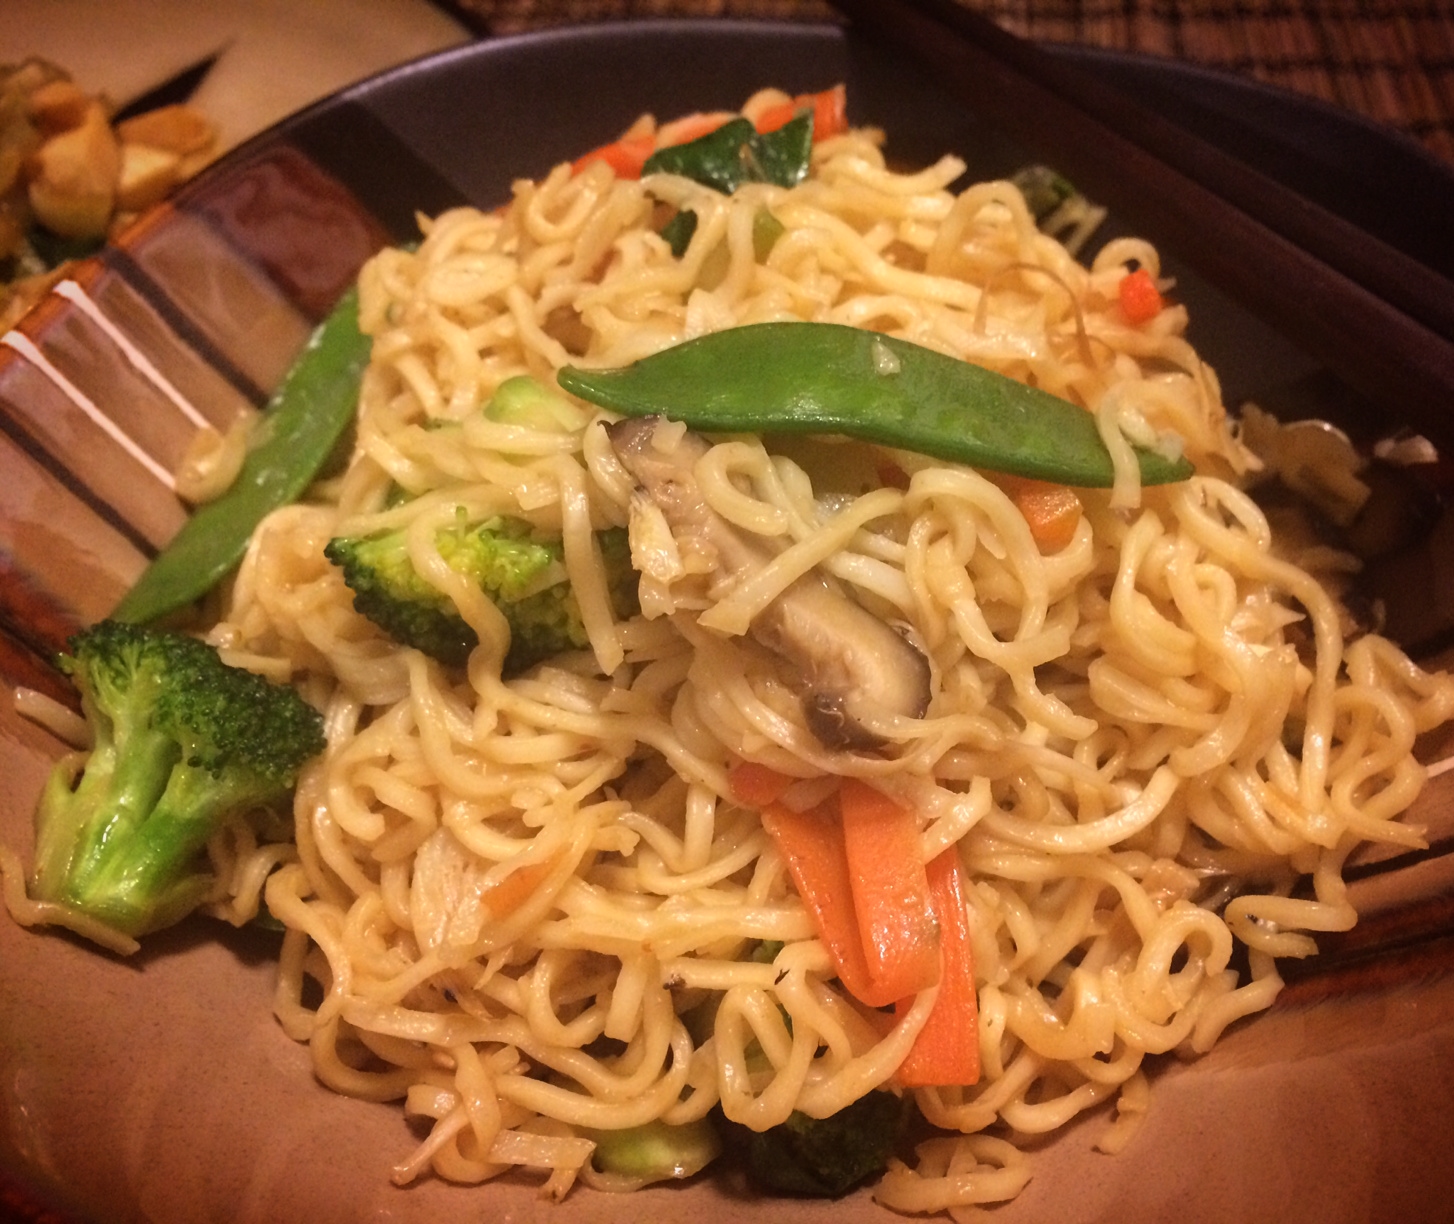
I really love stir-fried ramen. It has amazing texture and is simple to prepare at home, so if you’ve never tried it, there’s no time like the present. And just in case you were wondering – even versions packed with flavors are not expensive to make. Sure, it will cost more than $0.35 and it will definitely take a little more time to put together, but you can whip the following version up in 30 minutes, unless you are a perfectionist when prepping your veggies.
Now before we get started, let’s talk about the ingredients. You can get everything that’s necessary at any local food market in the US, but if you want some great ingredients at really great prices, and especially if you’d like to try some items that aren’t typically in your shopping basket, find an Asian grocery. If people of Asian decent live in your city/town, you likely have one. There’s even one in my tiny hometown of Albemarle, NC. If you are hesitant to go in, don’t be. No, you won’t be able to read everything, but someone there will speak English and most packaging has English on it somewhere. You just have to look carefully. If you are worried about the quality of products in the store, just pay attention to the clientele. If there are a lot of shoppers of Asian decent, you are in the right place, and as with any grocery, the food will be fresher if it is busier because products will be moving.
The Noodles
Buy them in the large packs at an Asian grocery if you can. There will be 24-30 noodle bricks in the package. Believe it or not, they’re cheaper that way. And they’re really good noodles. The kind Mike and I buy have a little slogan that reads “Delicious Noodle” in English. They aren’t lying. Of course, if you can’t get to an Asian grocery, go ahead and get the singles at your local grocery. Of course, we are not using the seasoning packet that comes standard. You have two options for this extra piece: 1) Throw it away. But that seems wasteful to me, so I would go with 2) Put it in your hiking pack with an empty water bottle. That way, if by some ill fortune, you find yourself stranded away from civilization while you’re on a hike, you can mix it with some of your water and get some calories into your system until you hike yourself out or help comes. (Though in a survival situation, I’d still advise care as the stuff is so extremely salty, and you wouldn’t want to blow through your water supply all at once. Still, it’s better than losing all your thinking capacity due to lack of calories.)
The Add-Ins
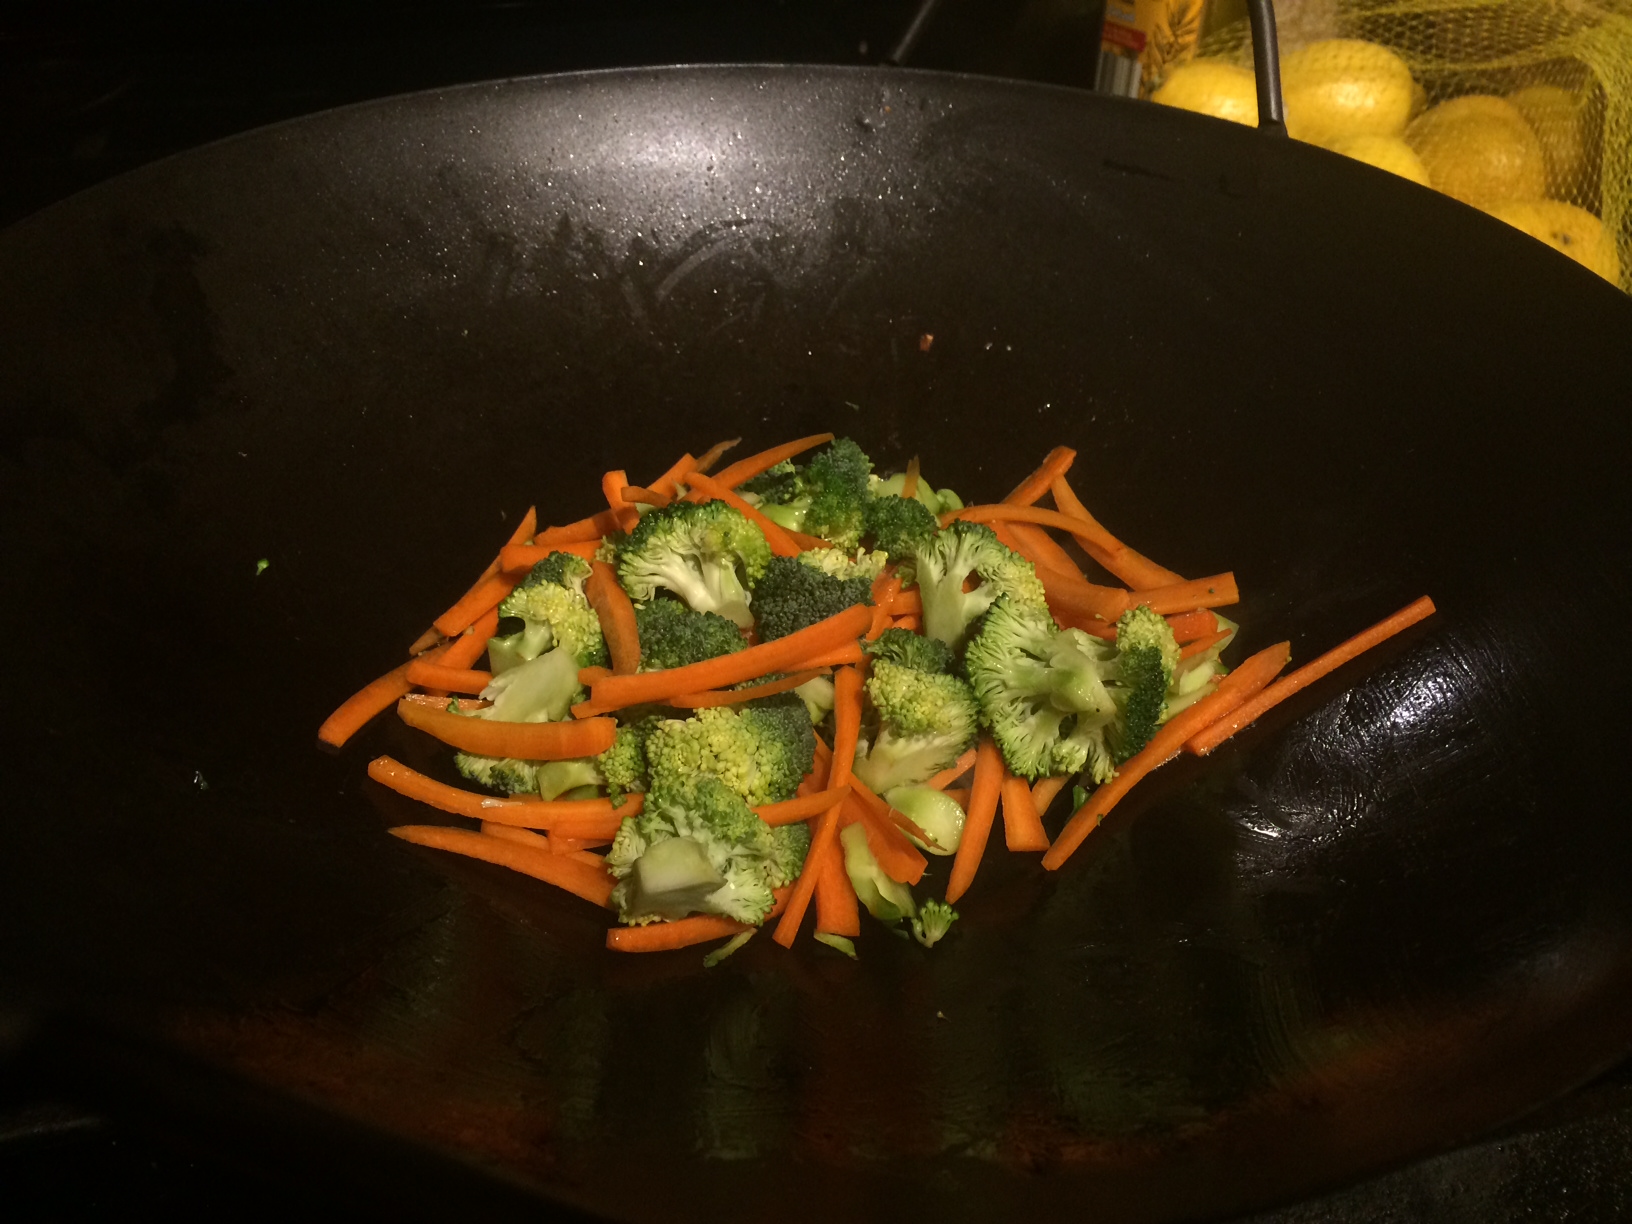
You can really add whatever you like in this stir-fry. I tend to use just veggies as they are healthy, take less time to prepare, and cheaper than meats. For the example ramen I made here, I used carrot, green onion, broccoli, snow peas, shitake mushrooms, and enoki mushrooms. (Note that I could use these fun mushrooms because I went to the Asian grocery where mushrooms are more fun and more affordable.) Of course, feel free to add meats if you wish. Just be sure that when you prepare, you add them to the wok first and cook them a few minutes before adding veggies.
The “If You’re Feeling Adventurous”
It is no secret that I am an adventurous eater. I’ll try just about anything once. I know that others may not be as comfortable as I trying something new, but if you’re bored with the “same ol’ same ol’” on your plate, pay close attention to this paragraph. In your neighborhood Asian market, you will likely find two areas that contains many dried items. One will contain vegetable and fruit items, and be on a shelf…there will be a lot of mushrooms here. The other will be in a cooler or refrigerator. It will contain fish, squid, octopus, and a magical little item that will make your ramen sing songs as it passes over your tongue and down your throat – dried shrimp.
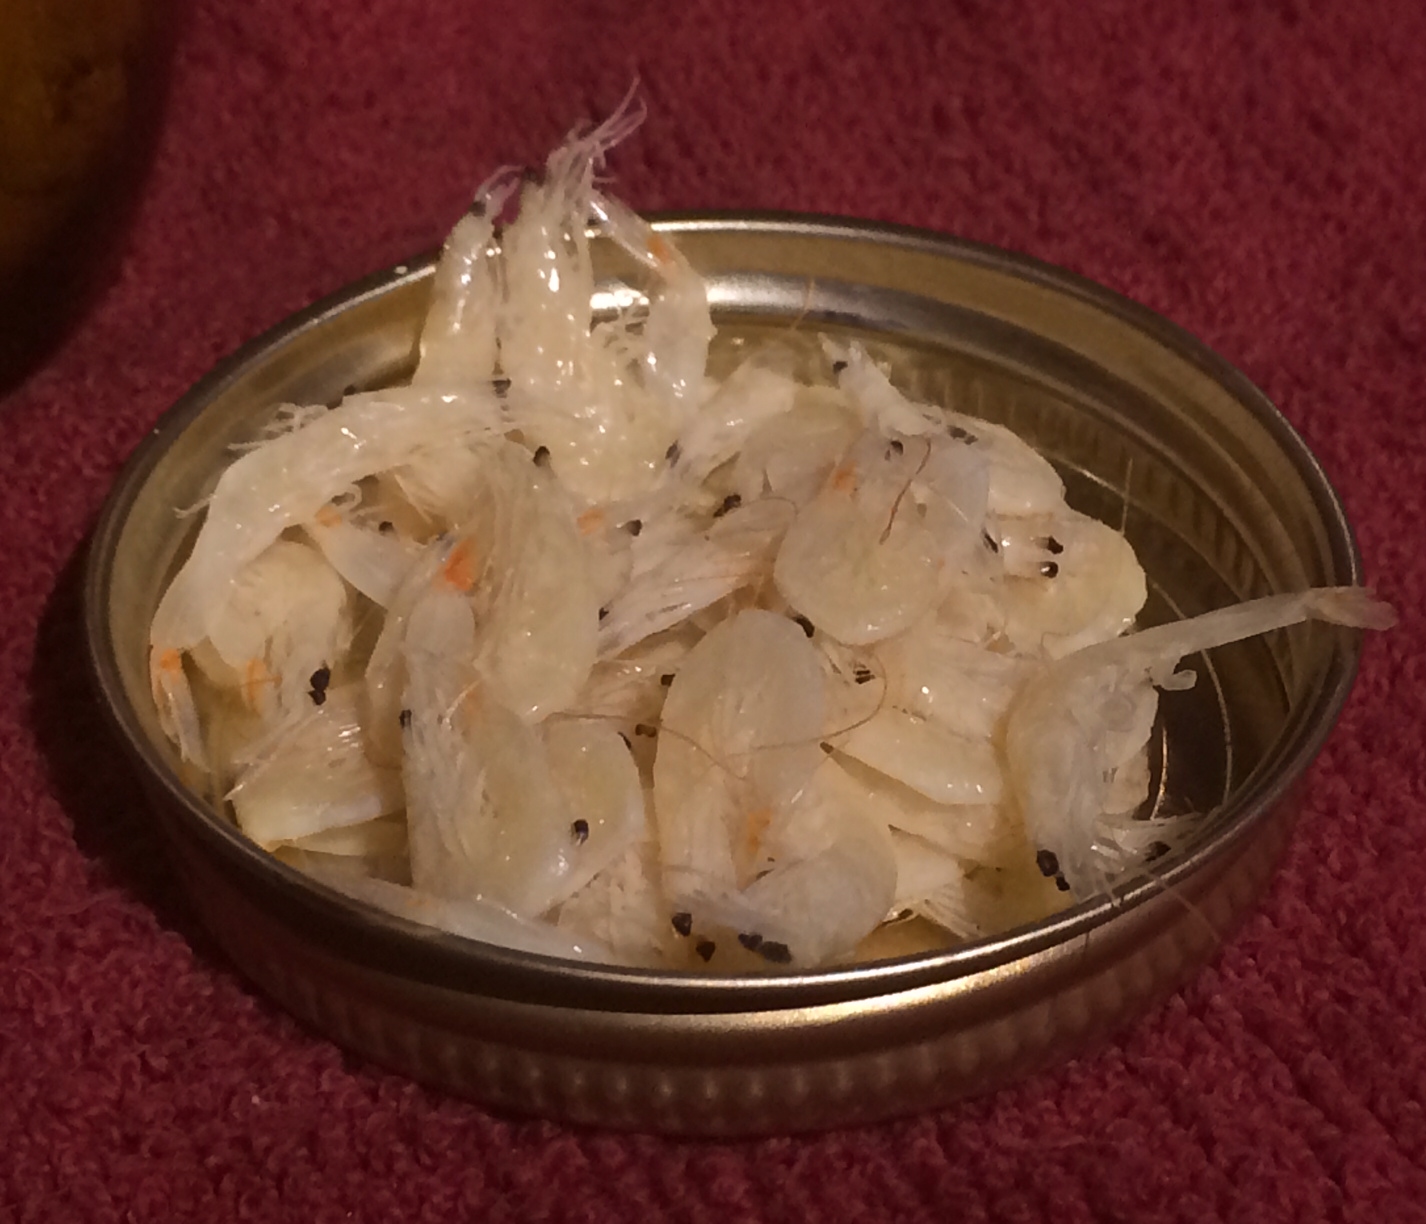
These guys are not the shrimp to which most Americans are accustomed. They are small – smaller than cocktail shrimp (some because they’re just dried; some because they’re difference species). As you began perusing your dried shrimp options, you will notice that they come in a variety of sizes, and they may even be different colors (white or a reddish-orange). The ones you see here are one of the small, white varieties. This is because they are simply dried shrimp – no color, no preservative, no salt added (and by the way, they don’t need it!) – just dried shrimp. As I only use them for flavor, not to create a shrimp component in my dishes, these are my pick. They’re not expensive. At my Asian market, I got my current packet for $1.99 and I’ve been using it for two months with plenty still remaining. I do store them in a lidded jar in the fridge. I’ve never had any spoil on me, but if they are going bad, you will smell and taste ammonia in them (just as you will with otherwise preserved shrimp that are going bad). I do occasionally give them a sniff/nibble test to be sure I’m still good. This post has some good basic information about dried shrimp, including sizes, if you want more infomation. When adding these to your ramen, you could grind them up with a mortar and pestle, but I don’t mind finding them in my food, so I just skip the crushing or trying to rehydrate and toss them in when it’s time. More on that in a minute.
Now…Not Your College Ramen for 2-4 Folks
What You’ll Need:
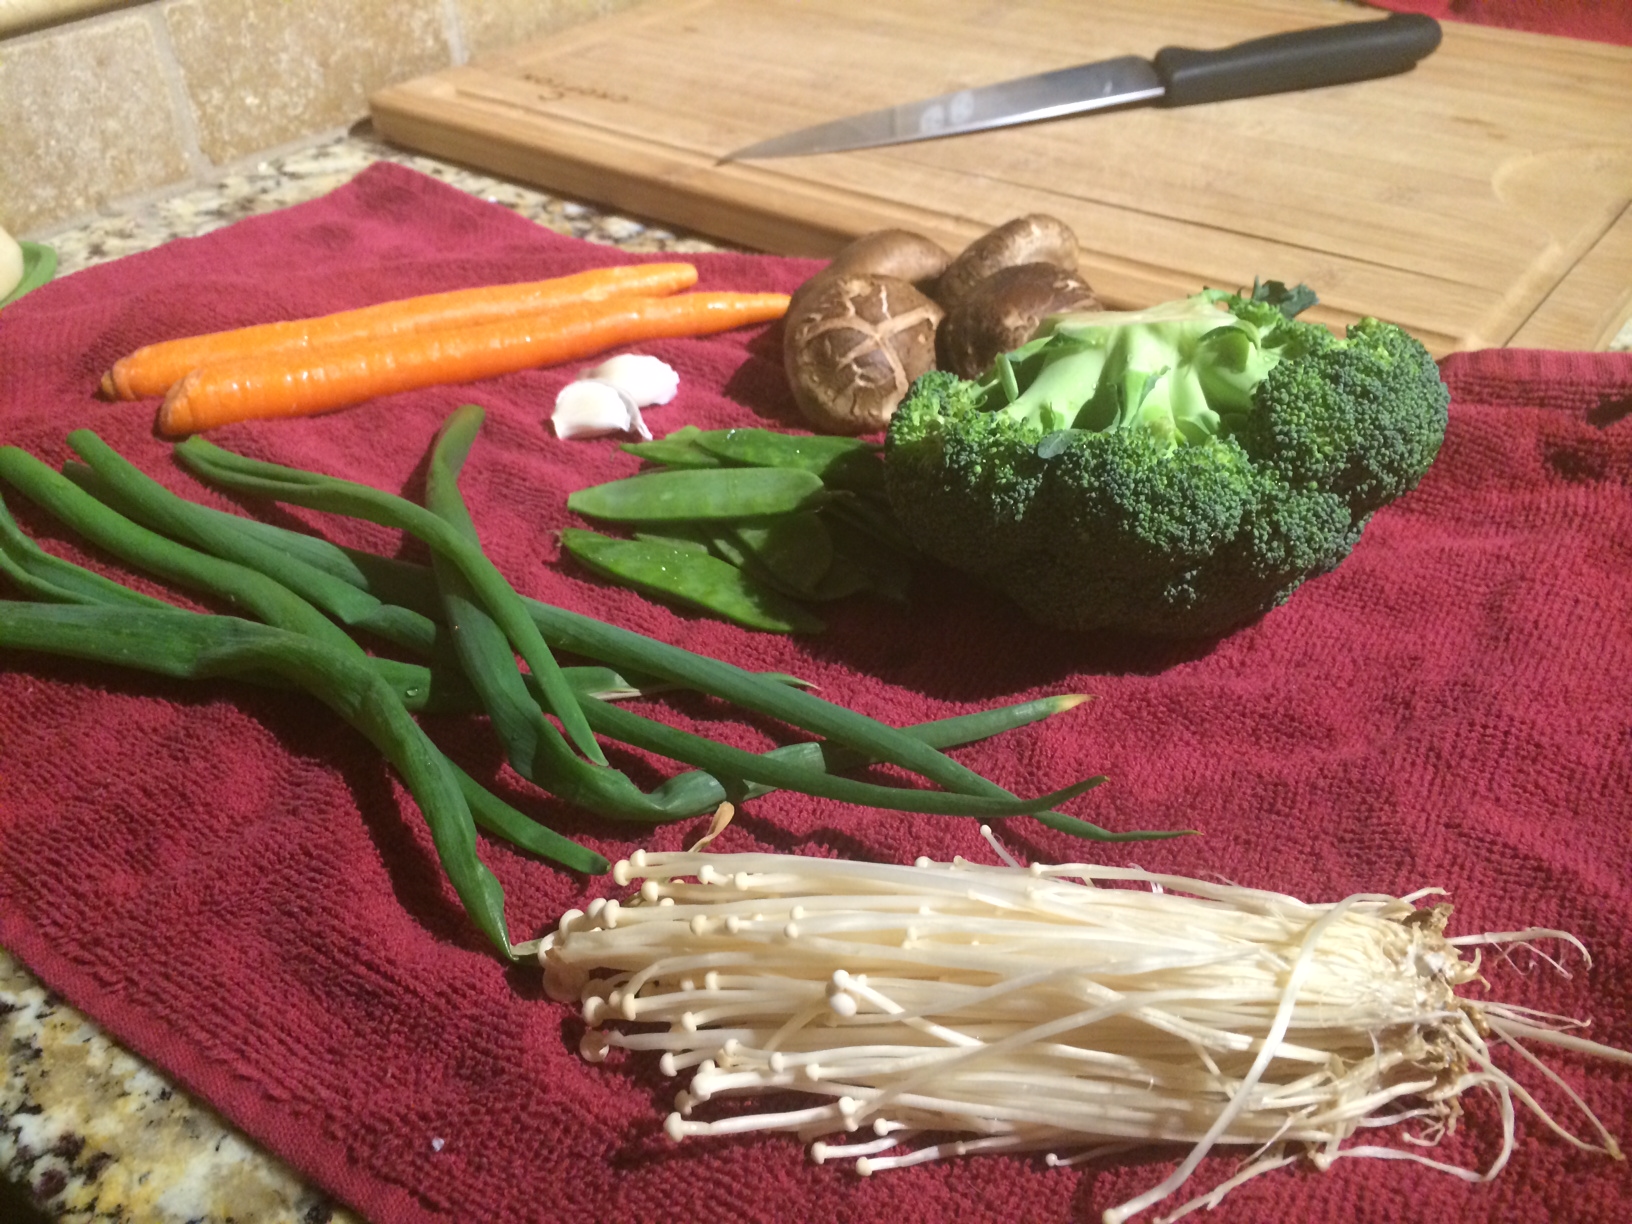
Ramen noodles, fresh veggies (for this one: carrot, snow pea, green onion, broccoli, shitake mushrooms, and enoki mushrooms), dried shrimp if you’re feeling adventurous, oil (I use olive because it’s what I keep), a garlic clove, chicken or vegetable stock, sesame oil, soy sauce, sriracha sauce, and cornstarch.
What You Do
Prep your veggies. This will be the most time consuming part. I cut my carrot into strips and my broccoli into pieces that are no bigger than 1.5 inches across the crown to facilitate quicker cooking.
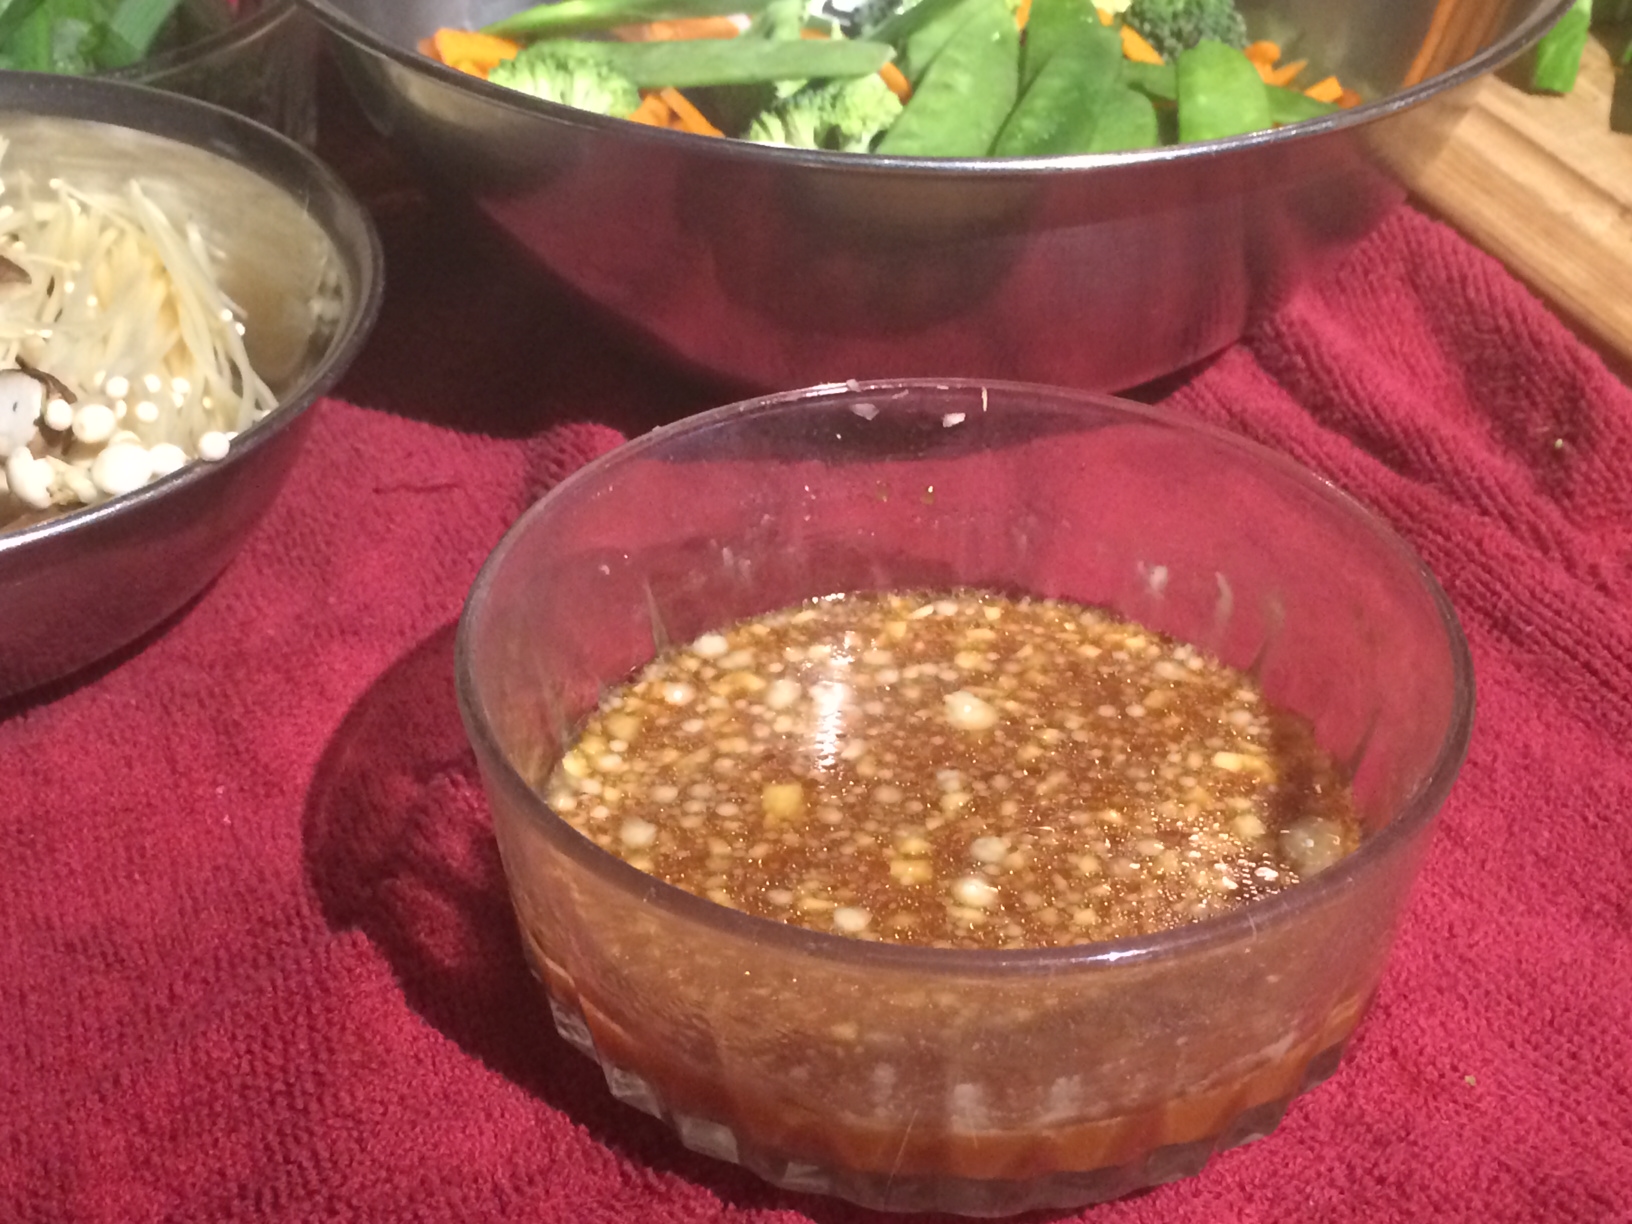
Mince your garlic and put it in a small dish. Now, here’s where it’s a little tricky for me to explain what I do, and a moment for you to have some freedom. I don’t measure often when I’m cooking. (Baking is a completely different matter…I measure like a chemist mixing explosives then.) This sauce should suit your taste and taste is subjective so feel free to alter quantities if you sample and think something needs to change. I like a balance of soy/stock, so add 3 tbsp – ¼ cup of stock and soy sauce, ¼ tsp sesame oil, and ¼-1 or 2 tsp sriracha (less for mild, more for spicy) to the dish and whisk. Taste it. Adjust as you see fit. Then add 1 tsp cornstarch and whisk it until the color is uniform. Set it aside.
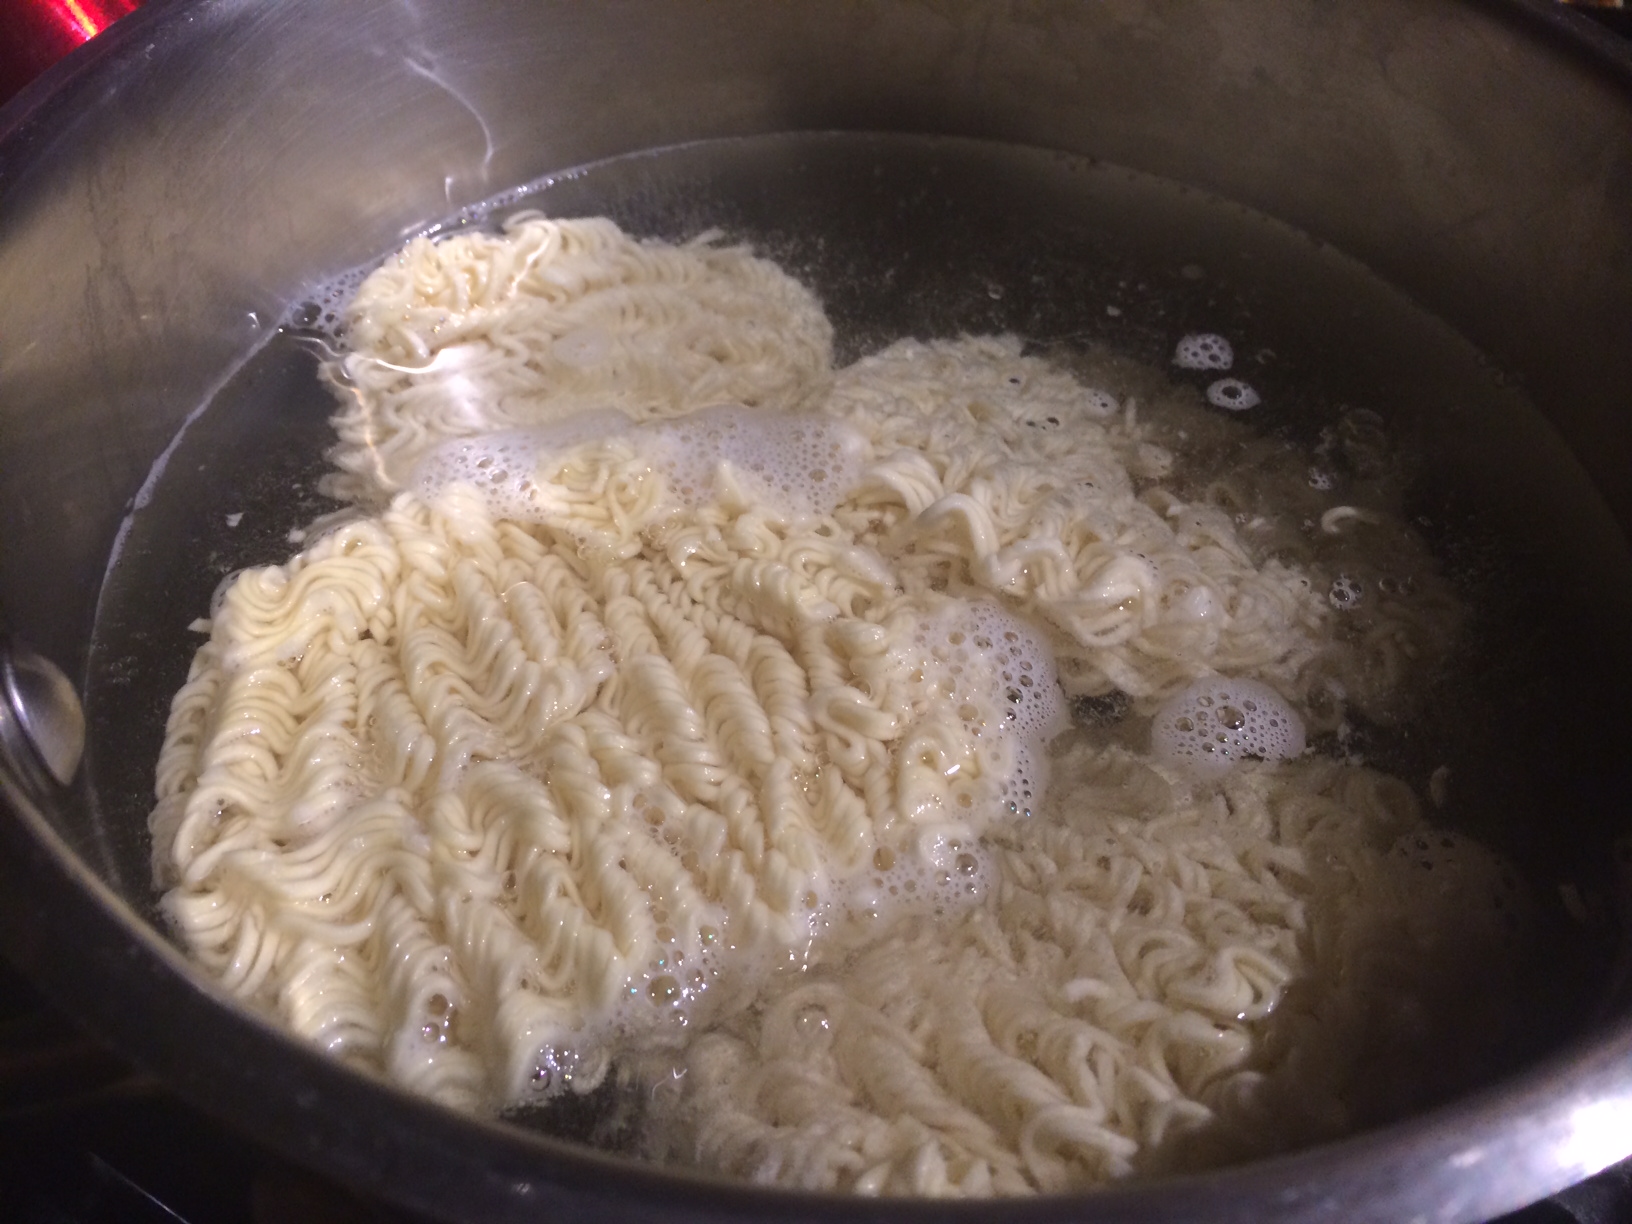
Boil some water to cook your ramen. I do this while I’m doing other tasks. Typically, I start it before I begin assembling my sauce. Remember the veggies cook quickly. I try to have the ramen finish cooking about the time the veggies are done.
Use a wok if you have one. In the absence of a wok, a deep frying pan will work, but woks cook food much faster because their shape focuses heat. Drizzle two or so tbsp of oil into the wok and turn the heat to medium or medium high. Medium is my setting because I am using a large gas burner. My high on that burner is pretty much insta-char. After the oil heats up, add the harder veggies – carrots and broccoli for this recipe. Sautee for 3-4 minutes.
If you haven’t dropped your ramen yet, your water is probably boiling, so do so – three to four noodle bricks. Set a timer. They only need to cook for three minutes, and you don’t want to over do it since you’re finishing them in the wok.
Add a palmful or two of the dried shrimp (depending on how big your hand is…mine’s pretty little) and the snow peas. Sautee for two minutes.

Don’t forget your noodles. When the timer goes off dump them in a strainer set in the sink to drain the water off. Leave them there. Also pay attention to what your veggies are telling you. If you see little char marks, turn the heat down. I usually end up having to turn my burner down, especially when I’m handling the noodles too, because gas stoves put out so much heat.
Finally add your mushrooms and green onions. Continue to sautee. The veggies will be done when the mushrooms begin to change colors and shrink by about 1/3. Don’t over cook the mushrooms. They’re MUCH better when you don’t.

Now turn the burner down to low, if you haven’t already. Add the noodles to the wok and immediately drizzle them with some oil. This is help keep the starch from sticking to the pan. Sautee for another minute or so. Whisk up your sauce again (the cornstarch has probably settled some), and pour over the dish. Continue to cook, stirring constantly until the sauce thickens and the noodles darken just a bit. (This won’t be more than one minute).
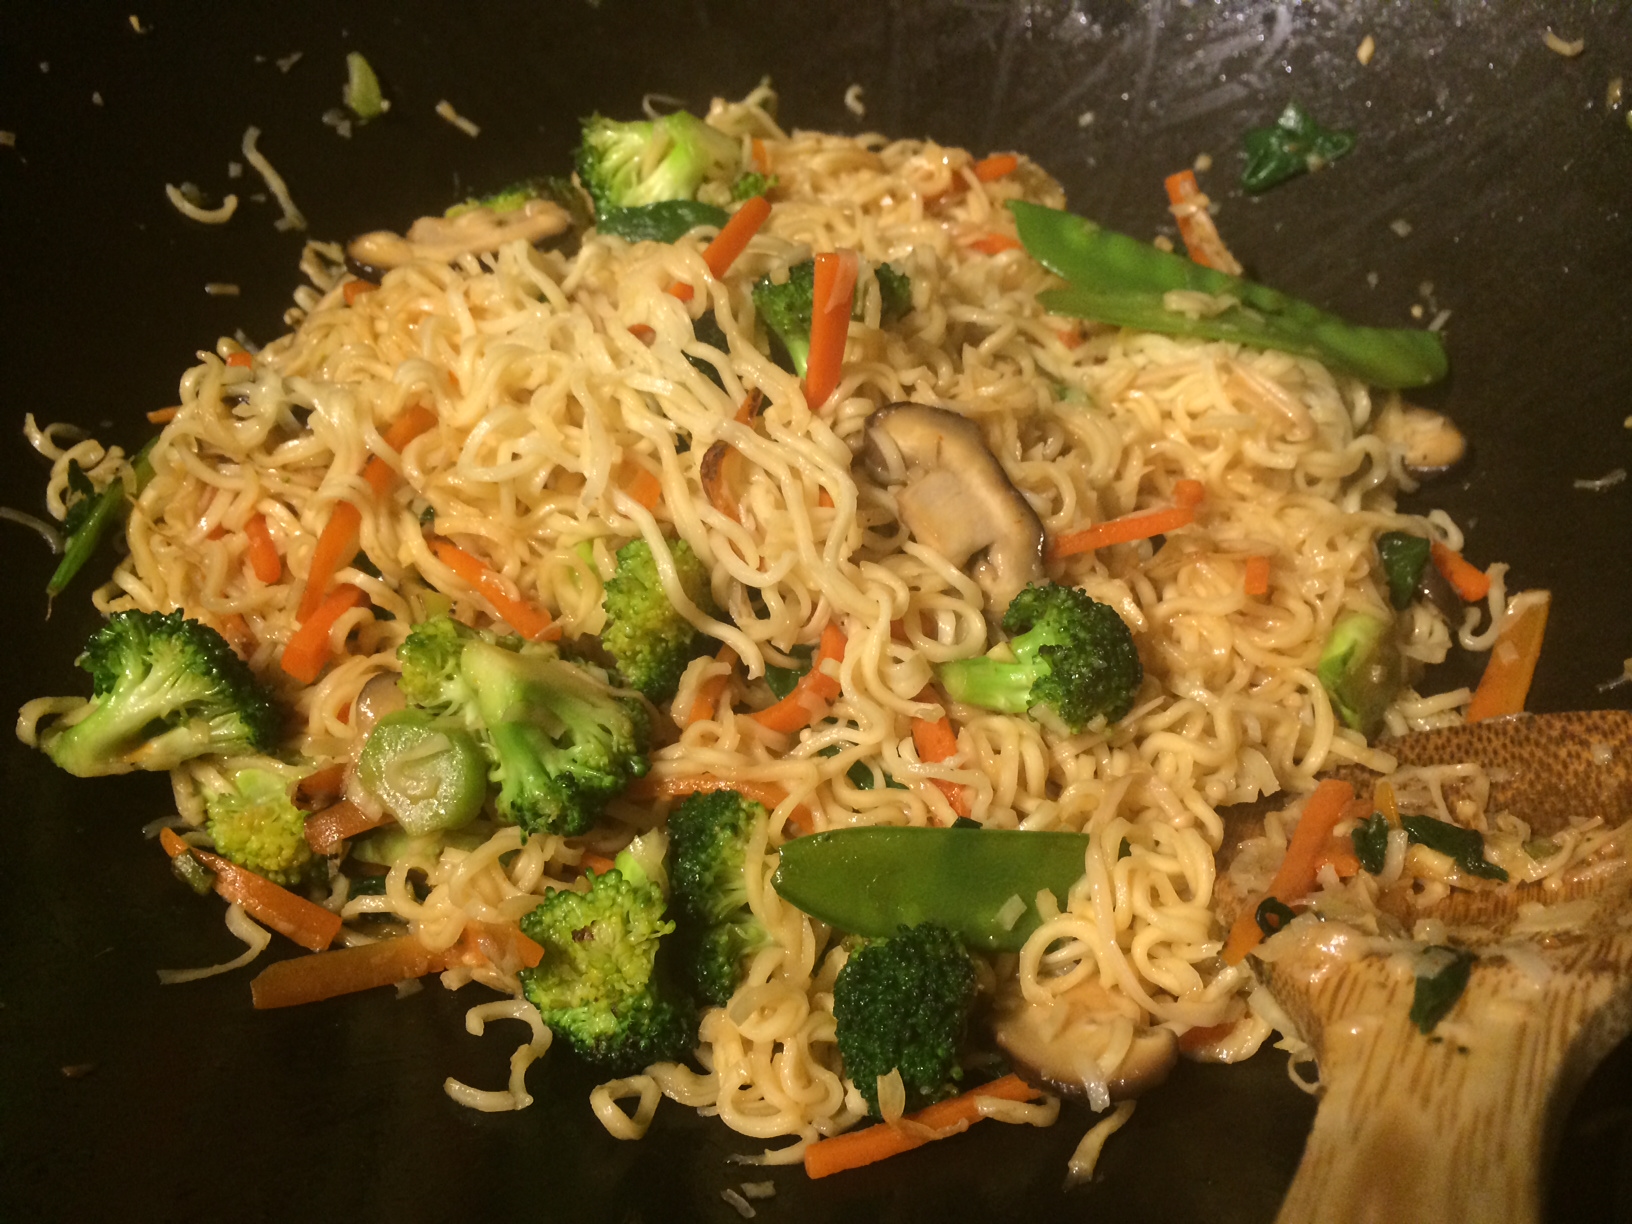
Turn off the wok and grab some bowls and chop sticks. It’s time to plate up and eat up. When I make ramen for Mike and I with this recipe using three bricks, we tend to eat it all. If he’s extra hungry or I want leftovers for lunch the next day, four bricks tends to get the job done. You can adjust this recipe easily by adding more veggies or noodles. You can also make it for one. Just use one or two bricks of noodles and half of the sauce. The rest of the sauce will store in the fridge for another time. When I make this just for myself. I just use one brick because I like extra veggies. Mike likes more noodles, so I adjust accordingly.

No, this is not your college ramen. It’s actually a real meal. It wasn’t expensive, and while it did take longer than three minutes. You did do it in thirty. See, sometimes, being an adult works out just fine.
Leave a Reply